Background properties in VML
I recently got to do some research around VML background images. And here’s what I learnt about simulating background CSS properties like background-repeat, background-size and background-position in VML.
But first, a bit of background (ha) about the basics of VML and background images.
Basics
VML is supported in The Outlooks on Windows using Word’s rendering engine (from 2007 to 2019). In order to use it, you need to declare the VML namespace in your code (xmlns:v="urn:schemas-microsoft-com:vml"). You can do this inline for every VML element you will use.
<v:rect xmlns:v="urn:schemas-microsoft-com:vml">
</v:rect>
Or you can declare it once and for all as an attribute of the <html> element of your email. (This is usually my preferred way to do it.)
<html lang="en" xmlns:v="urn:schemas-microsoft-com:vml">
You can then use any VML shape like <v:rect> or <v:oval>. We will use the stroked="false" attribute to remove the default border around VML shapes and a style attribute to define the width and height of the shape. (One VML oddity is that attributes like stroked or filled can also be written stroke or fill. I tend to prefer the former because it matches Microsoft documentation, even though the latter matches the VML specification.)
<v:rect stroked="false" style="width:600px;height:300px;">
</v:rect>
Then, inside that shape, we’ll use the <v:fill> element to define our background fill with various attributes detailed below.
<v:rect stroked="false" style="width:600px;height:300px;">
  <v:fill type="frame" color="#add5f7" src="https://i.imgur.com/pmS2PDm.png" />
</v:rect>
We can then include our HTML foreground content inside a <v:textbox> element.
<v:rect stroked="false" style="width:600px;height:300px;">
  <v:fill type="frame" color="#add5f7" src="https://i.imgur.com/pmS2PDm.png" />
  <v:textbox inset="0,0,0,0">
  	 <h1>Hello World!</h1>
  </v:textbox>
</v:rect>
If we want the background to adjust to the content, we can omit the height declaration on the <v:rect> element and apply a style="mso-fit-shape-to-text:true;" to the <v:textbox> element.
Because VML is only supported in The Outlooks (and versions of Internet Explorer 9 and below), I always wrap VML code between conditional comments for Outlook using the [if mso] expression. It’s also worth mentioning that there is an [if vml] expression, which would target all rendering engines supporting VML (like The Outlooks and IE9 and below).
<!--[if mso]>
<v:rect stroked="false" style="width:600px;height:300px;">
  <v:fill type="frame" color="#add5f7" src="https://i.imgur.com/pmS2PDm.png" />
</v:rect>
<![endif]-->
For the sake of syntax highlighting, I will not put these conditional comments for further examples below. But make sure to always have them around your VML code.
background-color
In VML, background-color can be replicated via the color attribute of the <v:fill> element. (This overrides the FillColor attribute you can apply directly on any VML shape.)
<v:rect stroked="false" style="width:600px;height:300px;">
  <v:fill color="#add5f7" />
</v:rect>
background-image
In VML, background-image can be replicated via the src attribute of the <v:fill> element.
<v:rect stroked="false" style="width:600px;height:300px;">
  <v:fill src="https://i.imgur.com/pmS2PDm.png" color="#add5f7" />
</v:rect>
background-repeat
In VML, background-repeat can be replicated via the type attribute of the <v:fill> element. There are two possible values that can mimick a CSS equivalent:
type="frame"(equivalent tobackground-repeat:no-repeat)type="tile"(equivalent tobackground-repeat:repeat)
As far as I know, it is not possible to simply define an equivalent to the CSS values repeat-x or repeat-y (nor space or round, but those are very rarely used in CSS anyway).
<v:rect stroked="false" style="width:600px;height:300px;">
  <v:fill type="frame" src="https://i.imgur.com/pmS2PDm.png" color="#add5f7" />
</v:rect>
Using a type="frame" value will make the image fit the entire shape by default. Fortunately this is something we can manage with the following section.
background-size
In VML, keyword values contain and cover of background-size can be replicated via the aspect attribute of the <v:fill> element.
aspect="atleast"(equivalent tobackground-size:cover)aspect="atmost"(equivalent tobackground-size:contain)
We can also define exact dimensions via the sizes attribute of the <v:fill> element. Both dimensions (width and height of the image) need to be set, separated by either a space or a comma (so sizes="64px 64px" and sizes="64px,64px" are the same).
Sizes defined in pixels won’t be adjusted when Outlook is rendering at 120 dpi. So I recommend to always use values in points (where 1 pixel equals 0.75 point). The previous example would become: sizes="48pt,48pt".
An unexpected effect of sizes in VML is that it will also apply to the background color. So in our example, the background color will only be visible across our 48×48pt square.
<v:rect stroked="false" style="width:600px;height:300px;">
  <v:fill sizes="48pt,48pt" type="frame" src="https://i.imgur.com/pmS2PDm.png" color="#add5f7" />
</v:rect>
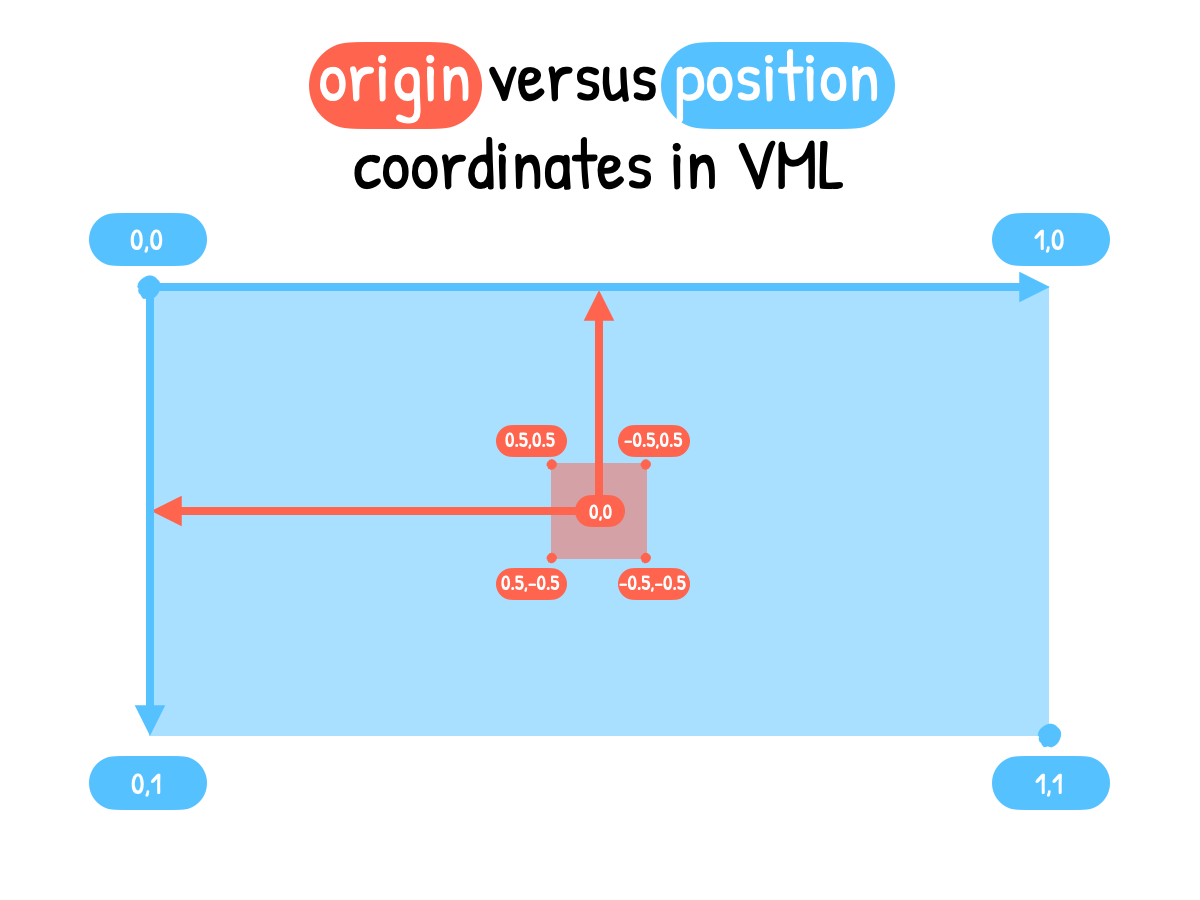
background-position
In VML, background-position can be replicated using the origin attribute and the position attribute. I found Microsoft’s documentation and the official VML specification super confusing about those attributes, sometimes not reflecting my experience with them at all. So here’s my own practical understanding on how these work in the Outlooks.
Both attributes require two coordinates (x and y), separated by a space or a comma. Each coordinate is a fraction value relative to the width and height (between 0 and 1) of the image for the origin attribute, and of the VML shape for the position attribute. The coordinates move from the top left of the VML shape for the position attribute, while they move from the center of the image for the origin attribute.
I like to picture myself the fill as an extra layer inside the VML shape. That layer takes the exact same size as the VML shape itself. The position attribute will move that entire layer inside the shape, with values being relative to the shape’s size (from 0 to 1). The origin attribute will move the image inside that layer from its center, with values being relative to the image’s size (from 0 to 1).
position and origin attributes with a type="frame" fill in VML.For example, if we wanted to move a 64x64 image to the bottom right of a 600x300 VML shape, we’d first define the position to 0.5, 0.5. This would move the entire fill layer half the size of the shape horizontally (300px) and vertically (150px). This would make the actual image partially visible in the bottom right corner. In order to make it reappear completely, we’d then define the origin attribute to 0.5, 0.5. This would move the background image itself half its size horizontally (32px) and vertically (32px).
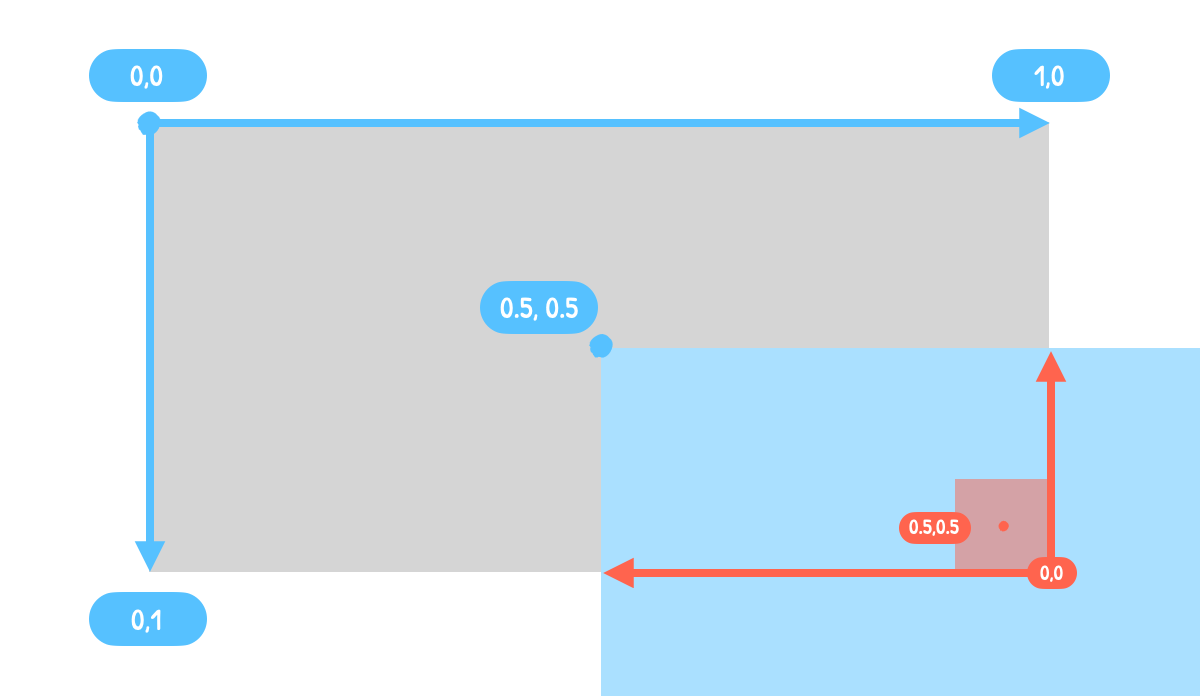
position attribute moves the fill layer (in blue) while the origin attribute moves the background image itself (in red).In my experience, positioning a background image in VML is slightly different whether the image is repeated or not.
Non repeated background image
With a non repeated background image (type="frame" in VML), we’ll play with both the origin and position attributes. Here are different equivalent to usual values in CSS.
origin="-0.5,-0.5" position="-0.5,-0.5"equalstop leftorigin="0.5,-0.5" position="0.5,-0.5"equalstop rightorigin="-0.5,0.5" position="-0.5,0.5"equalsbottom leftorigin="0.5,0.5" position="0.5,0.5"equalsbottom right
<v:rect stroked="false" style="width:600px;height:300px;">
  <v:fill origin="0.5,0.5" position="0.5,0.5" type="frame" sizes="48pt,48pt" src="https://i.imgur.com/pmS2PDm.png" color="#add5f7" />
</v:rect>
Repeated background image
With a repeated background image (type="tile" in VML), we’ll only need the position attribute. Here are different equivalent to usual values in CSS.
position="0,0"equalstop leftposition="1,0"equalstop rightposition="0,1"equalsbottom leftposition="1,1"equalsbottom right
<v:rect stroked="false" style="width:600px;height:300px;">
  <v:fill position="1,1" type="tile" sizes="48pt,48pt" src="https://i.imgur.com/pmS2PDm.png" color="#add5f7" />
</v:rect>
Conclusion
You can find an overall code example here (and here is the corresponding Email on Acid test).
Last year, in my Outlook article, I stated that:
VML is still very much unexplored territory in the email world and I strongly believe that there’s a lot more to discover.
I can’t emphasize this enough as I learn more and more about VML. I invite you to read through Mark Robbins’ own experiments (like CSS triangles or SVG to VML).
Let me know if you learn anything exciting about VML!